Delicious Chia Pudding with Homemade Granola Recipe
Introduction and Quick Summary
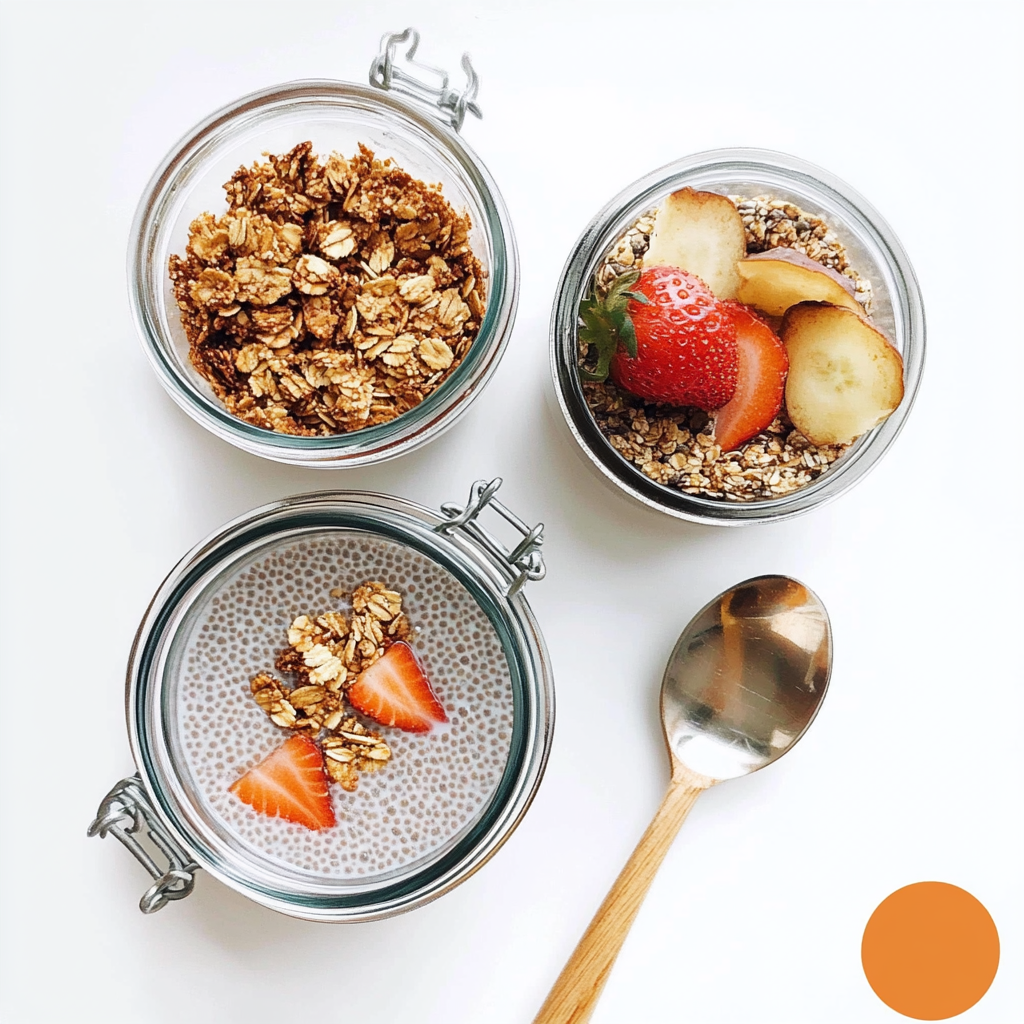
Chia pudding with homemade granola is a delightful way to start your day or enjoy as a healthy snack. This nutritious dish is packed with fiber, omega-3 fatty acids, and protein, making it an excellent choice for anyone looking to boost their health. The beauty of this recipe lies in its simplicity; you can prepare it in advance, allowing the chia seeds to absorb the liquid overnight, resulting in a creamy texture that’s both satisfying and delicious. Pairing this with crunchy, homemade granola adds a wonderful contrast that elevates the experience. Not only does this combination taste incredible, but it’s also incredibly versatile—you can customize it with your favorite fruits, nuts, or sweeteners. Whether you’re on a busy morning rush or enjoying a leisurely brunch at home, this chia pudding with homemade granola will surely impress. In just a few steps, you’ll have a wholesome meal that’s ready to fuel your day.
Why You’ll Love This Chia Pudding with Homemade Granola
-
Health Benefits: Chia seeds are rich in nutrients like fiber and antioxidants, which can help support digestive health and reduce inflammation.
-
Make-Ahead Convenience: Prepare the chia pudding the night before for a quick grab-and-go breakfast option that saves time in your busy morning routine.
-
Culinary Creativity: This recipe offers endless customization options—add your favorite fruits, nuts, or spices to create a unique flavor profile every time you make it.
Ingredients for Chia Pudding with Homemade Granola
Here’s what you’ll need to make this delicious dish:
-
Chia Seeds: These tiny seeds are key for creating the pudding’s unique texture; look for high-quality organic chia seeds for the best results.
-
Milk (or Plant-Based Alternative): Use any type of milk you prefer—dairy or plant-based—to soak the chia seeds and create a creamy consistency.
-
Honey or Maple Syrup: A natural sweetener adds flavor; adjust the amount based on your sweetness preference.
-
Vanilla Extract: A splash of vanilla enhances the overall flavor of the chia pudding; opt for pure vanilla extract for an authentic taste.
For the Granola:
-
<strong Oats: Rolled oats are essential for granola; choose old-fashioned oats for optimal texture and chewiness.
-
Nuts and Seeds: Incorporate any variety of nuts and seeds that you enjoy; they add crunch and healthy fats to your granola mix.
-
Coconut Oil: Melting coconut oil helps bind the ingredients together while providing a subtle tropical flavor.
The full ingredients list, including measurements, is provided in the recipe card directly below.
How to Make Chia Pudding with Homemade Granola
Follow these simple steps to prepare this delicious dish:
Step 1: Prepare the Chia Pudding
In a mixing bowl, combine chia seeds, milk of choice, honey or maple syrup, and vanilla extract. Stir well to avoid clumping and let it sit for about five minutes before stirring again.
Step 2: Refrigerate
Cover the bowl with plastic wrap or transfer it to an airtight container. Place it in the refrigerator for at least four hours or overnight until the mixture thickens into pudding consistency.
Step 3: Preheat Oven
When you’re ready to make granola, preheat your oven to 350°F (175°C). Line a baking sheet with parchment paper for easy cleanup.
Step 4: Mix Granola Ingredients
In a large bowl, combine rolled oats, chopped nuts and seeds, melted coconut oil, honey or maple syrup if desired. Mix until everything is evenly coated.
Step 5: Bake
Spread the granola mixture evenly on the prepared baking sheet. Bake for about 20-25 minutes until golden brown, stirring halfway through for even cooking.
Step 6: Assemble
Once both components are ready, layer chia pudding in serving bowls topped with homemade granola. Add fresh fruits if desired and serve immediately.
Tips and Tricks
Here are some helpful tips to ensure the best results for your dish:
-
Soaking Time: Allow sufficient soaking time—ideally overnight—for optimal texture and flavor infusion of chia seeds.
-
Granola Storage: Store leftover granola in an airtight container to maintain its crunchiness; it should last up to two weeks.
-
Add Seasonal Fruits: Enhance flavors by topping your pudding with seasonal fruits like berries or bananas that pair well with chia pudding.
How to Serve Chia Pudding with Homemade Granola
This Chia Pudding with Homemade Granola is versatile and pairs wonderfully with:
-
Fresh Berries: The natural sweetness and acidity of berries enhance the pudding’s creamy texture.
-
Yogurt: Adding yogurt creates a rich and tangy layer that complements the chia pudding perfectly.
-
Nuts and Seeds: A sprinkle of nuts or seeds adds crunch and nutritious benefits to your dish.
Feel free to pair it with your favorite sides for a personalized meal!
Make Ahead and Storage
-
Make Ahead: Prepare the chia pudding up to 3 days in advance. Combine chia seeds with milk and sweetener, then refrigerate for at least 4 hours or overnight for best results. You can also make granola ahead of time by baking it at 350°F (175°C) for about 20 minutes, stirring halfway through.
-
Storing: Store leftover chia pudding in an airtight container in the refrigerator for up to 5 days. Granola should be kept in a cool, dry place in a sealed jar, where it will stay fresh for up to two weeks.
-
Reheating: There’s no need to reheat chia pudding; simply enjoy it cold. If you want warm granola, place it in a microwave-safe bowl and heat for about 15-30 seconds until warm but not hot.
Suggestions for Chia Pudding with Homemade Granola
Choose the Right Chia Seeds
When making chia pudding with homemade granola, selecting high-quality chia seeds is crucial. Look for organic seeds to ensure they are free from contaminants and packed with nutrients. Freshness matters, too; old seeds can lose their nutritional value and may not thicken properly. Store your chia seeds in an airtight container in a cool, dark place to maintain their freshness. This simple step can significantly enhance the texture and flavor of your pudding.
Use the Correct Liquid Ratio
Achieving the perfect consistency for your chia pudding requires the right liquid-to-chia seed ratio. Typically, you should use three tablespoons of chia seeds for every cup of liquid. If you use too much liquid, your pudding will be runny and unappealing. Conversely, not enough liquid will result in a dry texture that lacks creaminess. Experiment with different plant-based milks or yogurts to find your perfect blend.
Allow Enough Time to Soak
One common mistake when preparing chia pudding is not allowing enough time for the seeds to soak. For optimal results, let the mixture sit for at least four hours or overnight in the refrigerator. This soaking period allows the chia seeds to absorb the liquid fully and expand, creating that signature creamy texture. Rushing this process leads to a less enjoyable eating experience.
Layering Your Granola
When serving chia pudding with homemade granola, layering is key to achieving a delightful presentation. Start by adding a layer of chia pudding at the bottom of your serving glass or bowl, followed by a generous sprinkle of granola. Repeat this process until you reach the top, finishing with fresh fruit or nuts for added flavor and visual appeal. This method ensures each bite offers a mix of textures and flavors.
FAQs
What are the health benefits of chia pudding?
Chia pudding is rich in omega-3 fatty acids, fiber, and protein, making it an excellent choice for those seeking a nutritious breakfast or snack option. The soluble fiber in chia seeds helps regulate digestion and keeps you feeling full longer. Additionally, antioxidants found in these tiny seeds can protect your body from oxidative stress. Pairing chia pudding with homemade granola adds even more nutrients like whole grains and healthy fats.
Can I make chia pudding ahead of time?
Yes! Chia pudding is perfect for meal prep because it can be made ahead of time and stored in the refrigerator for up to five days. Make individual servings in jars so you can grab one on busy mornings or enjoy them as snacks throughout the week. Just remember to store your homemade granola separately to maintain its crunchiness until you’re ready to serve.
How do I customize my chia pudding?
Customizing your chia pudding is easy! Start with your base recipe using your preferred liquid—like almond milk or coconut milk—and then add sweeteners such as honey or maple syrup according to taste. You can also incorporate flavorings like vanilla extract or cocoa powder for added depth. Top it off with fresh fruits, nuts, or even spices like cinnamon to create an exciting variety each time.
Is homemade granola healthier than store-bought?
Homemade granola often contains fewer preservatives and added sugars compared to store-bought options, making it a healthier choice overall. When you make your own granola, you can control the ingredients and tailor them to meet your dietary preferences—be it gluten-free oats or nut-free recipes. Plus, it’s an opportunity to experiment with flavors while ensuring that every bite is deliciously wholesome.
Conclusion for Chia Pudding with Homemade Granola
In summary, creating delicious chia pudding with homemade granola involves attention to detail at each step—from selecting quality ingredients to mastering texture through proper soaking time. Avoiding common mistakes such as using incorrect ratios and neglecting presentation ensures that your dish looks as good as it tastes. By customizing flavors and preparing ahead of time, you can enjoy this nutritious treat throughout the week effortlessly. Remember that both components work best together—making this dish not only appealing but also satisfying and healthy!
Chia Pudding with Homemade Granola
Chia pudding with homemade granola is a nutritious and delicious way to start your day or enjoy as a snack. This recipe combines creamy chia pudding, rich in fiber and omega-3 fatty acids, with crunchy granola for a delightful texture contrast. Perfect for meal prep, this dish is customizable with your favorite fruits and sweeteners, ensuring every bite is satisfying and wholesome. Prepare the chia pudding the night before for a quick grab-and-go breakfast that fuels your day!
- Prep Time: 15 minutes
- Cook Time: 25 minutes
- Total Time: 40 minutes
- Yield: Serves 4
- Category: Breakfast
- Method: Refrigeration and Baking
- Cuisine: International
Ingredients
- 1/2 cup chia seeds
- 2 cups milk (dairy or plant-based)
- 3 tbsp honey or maple syrup
- 1 tsp vanilla extract
- 1 1/2 cups rolled oats
- 1/2 cup nuts and seeds (your choice)
- 1/4 cup coconut oil
Instructions
- In a bowl, mix chia seeds, milk, honey or maple syrup, and vanilla extract until well combined. Let sit for 5 minutes and stir again.
- Cover and refrigerate for at least 4 hours or overnight until thickened.
- Preheat oven to 350°F (175°C). Line a baking sheet with parchment paper.
- In a large bowl, combine rolled oats, nuts and seeds, melted coconut oil, and additional sweetener if desired. Mix thoroughly.
- Spread the granola mixture onto the prepared baking sheet and bake for 20-25 minutes until golden brown, stirring halfway through.
- Once ready, layer chia pudding in bowls topped with homemade granola and fresh fruits.
Nutrition
- Serving Size: 1 cup (240g)
- Calories: 410
- Sugar: 12g
- Sodium: 40mg
- Fat: 22g
- Saturated Fat: 9g
- Unsaturated Fat: 10g
- Trans Fat: 0g
- Carbohydrates: 43g
- Fiber: 14g
- Protein: 11g
- Cholesterol: 0mg